Basic Inputs
This section will give you an overview over the basic inputs on your device. Additionally, it will help you understand the terminology which is used throughout this wiki and within the retro gaming community.
The face buttons
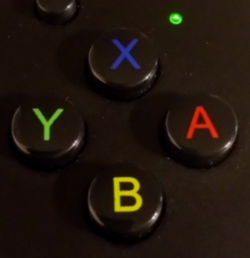
Most KNULLI-compatible handhelds have a set of face buttons - usually on the right side of the device. On most devices, you have four face buttons. Depending on your device and/or controller, the buttons may have different labels.
KNULLI mostly follows the labeling system known from SNES and the Anbernic devices. However, the buttons are sometimes also referred to by their respective directions to avoid confusion for users of PlayStation or Xbox controllers.
Face buttons on different systems
| KNULLI | Location | Direction | PS | XBOX |
|---|---|---|---|---|
| X | North | △ | Y | |
| A | East | ○ | B | |
| B | South | ✕ | A | |
| Y | West | ◻ | X |
Switch confirm/cancel in EmulationStation
By default, KNULLI follows the control scheme of Nintendo devices in all menus: A for OK/confirm and B for cancel/back. However, if you feel more familiar with the PlayStation scheme, press Start to bring up the main menu, go to System settings and find Frontend Developer Options. Here you will find a toggle to Switch confirm & cancel buttons in EmulationStation.
In-game prompts might not match the labels on your device
KNULLI is a CFW for retro gaming emulation which also supports certain ports of Linux games. The labels on the device are labeled Nintendo-style as explained in the table above: A is east (), B is south (), and so on.
It should be obvious, but since some users reported this as a "bug", please understand this:
Many games will prompt for button labels which do not match the labels printed on the buttons of your handheld. For example, if you play a PSX or PSP game and the game prompts for △, you need to press the X button (north, ), since the north button is labeled △ on PlayStation controllers, as explained in the table above.
Please be aware that many PortMaster games are hard-wired to consider your device as an Xbox controller. Hence, the games will give you Xbox-style prompts. Consequently, if a PortMaster game prompts for you to press the south button, chances are it will ask you to press A, however, it might be required for you to press B instead. We understand that this is counterintuitive, however, it is still the correct mapping by position.
Switch A/B and X/Y for ports
If you struggle with Xbox-style prompts of a ports game, it is possible to break the correct cardinal mapping and enforce an incorrect cardinal mapping which maps the buttons by label instead. This can only be set on a per-game basis in the Ports section:
- Go to the Ports section and pick the game you want to play with broken cardinal mapping
- Hold the button which launches the game (A or B, depending on your setup) to bring up the game menu
- Go to Advanced Game Options
- Find Switch A/B and X/Y and turn it on
Be aware that this will make some games hardly playable since all the actions are in the wrong place now.
The Function button
Each KNULLI-driven device has a dedicated button we refer to as the Function button. Depending on your device, the Function button can be in different places. E.g., for the Anbernic RG35XX H, the button is located at the top right of the device, indicated by the letter F. (Sometimes, the Function button is also referred to as the "menu" button, the "FN" button, the "F" button, or the "hotkey".)
The button can be used to trigger a number of shortcuts which will help you control the currently running emulation core. Learn more about KNULLIs default shortcuts in the Hotkey Shortcuts section.
Select substitutes as function button on many external controllers
When playing with Bluetooth controllers without a Function button, the Select button often can be used as a substitute. However, be aware that in this case the default select action of the respective context is also triggered when you press the button.
The Power button
When your device is turned off, the power button can be used to turn on your KNULLI device as explained in the manual of your device. Once your Knulli device is turned on
- tap the power button once to switch into sleep mode (depending on your device, there might still be a lot of power consumption in sleep mode).
- hold the power button for 2 seconds (until the device vibrates) to do a normal shutdown.
- All system settings you made since you last booted your device will be saved automatically.
- If you are playing a game with a RetroArch core, your game will be saved automatically.
- If you are playing a game with a standalone emulator your game will not be saved automatically.
- hold the power button for 5 or more seconds to cut the power off, overriding the normal shutdown.
- Nothing will be saved - this is meant as a last resort when your device is frozen!
- hold the Function button and tap the power button to switch between LED modes:
- LED always on (default)
- LED turns off while playing (LED blinks to confirm)
- LED always off
- The LED mode will reset to default after each reboot/shutdown.
Clamshell lid
Some devices have clamshell form factor and therefore a lid. Depending on the device, it might be possible to use the lid for entering sleep mode or shutting down the device.
Returning from sleep mode when opening the lid
It is impossible for us to run any program code while a device is turned off or in sleep mode. Consequently, if the lid isn't hard-wired on the hardware level to act like a power button, it is impossible for us to register if the lid opens while the device is turned off or in sleep mode, simply because the device is turned off or in sleep mode.
Consequently, we cannot make such a device (e.g., the Anbernic RG35XX SP) wake up or boot when the lid opens. There is no point in asking our developers on Discord for the feature. There is no point in waiting for the feature. There is no point in pressuring. For some devices, it simply cannot be done.
The toggle switch
Some devices, e.g. the TrimUI Brick and the TrimUI Smart Pro come with a toggle switch. The toggle switch is an additional input that can be configured in Device Settings:
- Press ++"Start" to bring up the main menu
- Go to Device Settings
- Find Toggle Switch Mode and set it to
- mute/unmute to mute and unmute the device via toggle switch
- RGB on/off to enable or disable RGB LED via toggle switch
- Airplane mode on/off to enable or disable airplane mode via toggle switch